1.编写开机获取IP地址的python程序
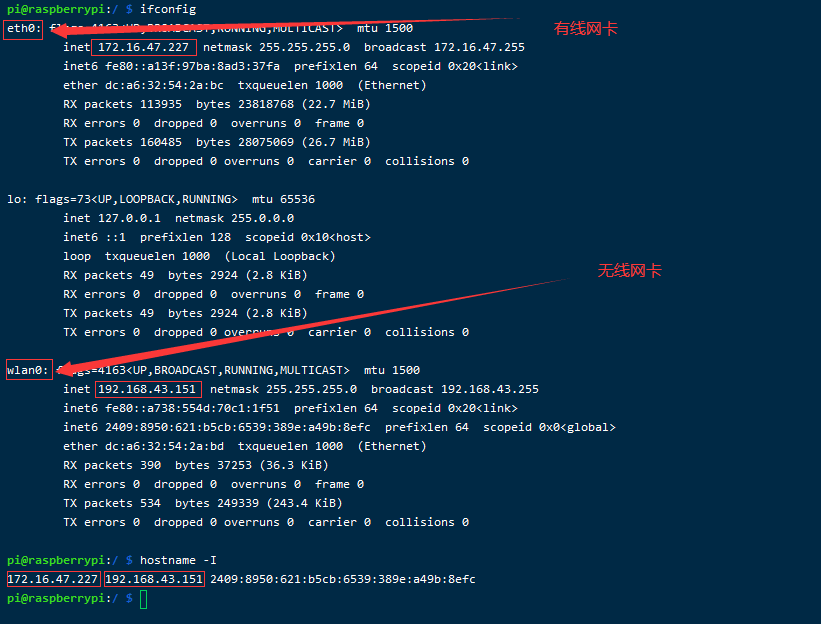
获取指定网卡的IP地址:ifconfig wlan0 | grep inet | grep -o -E ([0-9]+.){3}[0-9]+ | head -n 1
获取IP地址: hostname -I
import os
import smtplib
from email.mime.text import MIMEText
from email.mime.multipart import MIMEMultipart
from email.header import Header
from email.mime.image import MIMEImage
import subprocess
import time
import traceback

#延时15秒,使系统准备完毕(连上网络)
time.sleep(15)
#获取指定网卡 wlan0 的ip地址
cont = subprocess.getoutput("ifconfig wlan0 | grep inet | grep -o -E \([0-9]+\.\){3}[0-9]+ | head -n 1")

localtime = time.asctime(time.localtime(time.time()))

#将时间和IP地址写入日志文件中
log = cont+" "+localtime
with open("launlog.txt","a") as f:
    f.write("\n")
    f.write(log)


# 发送邮件服务器
smtpserver = 'smtp.qq.com'

#代发邮件的邮箱和用于登录的认证码(在QQ邮箱的设置中获取)
sender = "xxxxxxxxxx@qq.com"
aucode = 'xxxxxxxxxxx'

#接收邮件的IP地址
receiver = "xxxxxxxxxx@qq.com"

message = MIMEMultipart('related')
message['From'] = Header('RaspberryPi', 'utf-8')
message['To'] = Header('树莓派', 'utf-8')
subject = '树莓派'
message['Subject'] = Header(subject, 'utf-8')

ipContent = "无线网络IP:"+cont
content = MIMEText(ipContent, 'plain', 'utf-8')
message.attach(content)

try:
    smtp = smtplib.SMTP_SSL(smtpserver, 465)
    smtp.ehlo()
    smtp.login(sender,aucode)
    smtp.sendmail(sender, receiver, message.as_string())
    smtp.quit()
except smtplib.SMTPException:
	#将异常信息写入日志文件中
    with open("launlog.txt","a") as f:
        f.write('\n')
        f.write(traceback.format_exc())
2.编写开机启动脚本
wuxian.sh
#!/bin/bash

### BEGIN INIT INFO
# Provides:          scriptname
# Required-Start:    $remote_fs $network
# Required-Stop:     $remote_fs $network
# Default-Start:     3 4 5
# Default-Stop:      0 1 6 2
# Short-Description: Start daemon at boot time
# Description:       Enable service provided by daemon.
### END INIT INFO

do_start(){
    python3 /home/pi/Desktop/wuxian.py
    echo " start" >> /home/pi/Desktop/wuxian.txt
}

do_stop(){
   echo "stop " >> /home/pi/Desktop/wuxian.txt
}

do_restart(){
    echo "restart" >> /home/pi/Desktop/wuxian.txt
}

do_status(){
    echo "status" >> /home/pi/Desktop/wuxian.txt
}

do_fallback(){
    echo "fallback" >> /home/pi/Desktop/wuxian.txt
}

case "$1" in
start) do_start
    ;;
stop) do_stop
    ;;
restart) do_restart
    ;;
status) do_status
    ;;
*) do_fallback
    ;;
esac
exit 0
3、系统配置
(1)将 wuxian.sh 放置 /etc/init.d/ 文件夹中 (2)在 /etc/rc5.d/ 文件夹下创建一个wuxian.sh的软连接 (3)在终端中输入ln -s /etc/init.d/wuxian.sh ./S01wuxian.sh
注意:
a.此时 wuxian.py 在 /home/pi/Desktop/ 中
b.wuxian.sh在/etc/init.d/中
c.软连接S01wuxian.sh在/etc/rc5.d/中
d.有线网络的IP地址获取将Python脚本里面的wlan0改成eth0就行


